Add YeboID sign-in
Using an AI coding agent? Generate a working integration with one command. The setup CLI checks your registered callback and permissions before generating code.
This quickstart uses React + Node. For an existing project, choose its platform: Swift, Kotlin, React Native, Python and Flutter have their own setup instructions.
Give users one account and one shared username across YeboID and Hiyebo. Your app stores the stable sub as its user reference. Fetch profile data from YeboID with the user's consent.
Before you start
You need a YeboID account, a React project, a Node API if you protect server routes, and the exact address where your app receives the sign-in callback. Allow about 20 minutes for a first integration.
You will finish with a sign-in button, a working callback and a protected /me route. The screenshots show the actual interfaces; the registration form contains unsaved tutorial values and the consent preview uses synthetic data.
1. Register an application
Sign in at YeboID, then open Developer Apps. Create an app with the exact callback URL your app serves, for example http://localhost:5173/auth/callback for local development and https://example.com/auth/callback for production. Select openid, profile, and offline_access for basic sign-in.
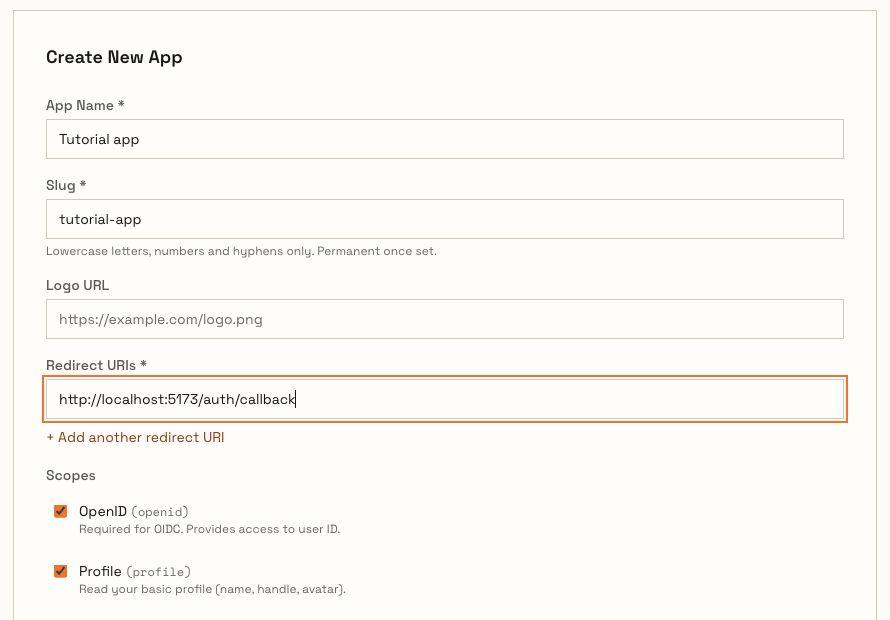
Current developer portal, captured 24 October 2026. These example values were not submitted. Select the image to view it full size.
Fill App Name with a name people will recognise on the consent screen. Choose a unique Slug; it cannot be renamed later. Add your local callback under Redirect URIs, and use + Add another redirect URI for the production callback. Select Basic sign-in to request openid, profile and offline_access; add other permissions only when needed. Review the entries, then create the application.
Check before continuing: your application appears in Developer Apps, its registered callback matches your app character for character, and you have copied its client ID. A browser integration needs the client ID, not the client secret.
The client ID is public. Keep the client secret on your server; browser and mobile clients never receive it. Registration details.
2. Install the SDKs
npm install yeboid-web
# In your Node API project:
npm install yeboid-node
Public releases: Web 0.5.0, Node 2.0.0. Both exact versions were installed from npm using empty npm configuration and a fresh cache, without an npm token. The installed packages passed runtime and TypeScript integration checks. See release verification.
3. Add the React provider and button
import { YeboIDProvider, YeboIDSignInButton, useYeboID } from 'yeboid-web/react';

function Account() {
  const { user, isLoading, error, retry, signOut } = useYeboID();
  if (isLoading) return <p>Loading your account…</p>;
  if (error) return <div role="alert">{error.message} <button onClick={() => void retry()}>Retry</button></div>;
  if (!user) return <YeboIDSignInButton />;
  return <p>Signed in as @{user.preferred_username} <button onClick={() => void signOut().catch(window.alert)}>Sign out</button></p>;
}

export function App() {
  return <YeboIDProvider config={{
    clientId: import.meta.env.VITE_YEBOID_CLIENT_ID,
    redirectUri: `${window.location.origin}/auth/callback`,
    scope: ['openid', 'profile', 'offline_access'],
  }}><Account /></YeboIDProvider>;
}
Set VITE_YEBOID_CLIENT_ID to the registered client ID. Serve your app on /auth/callback with the same provider. The provider checks OAuth state, exchanges the authorization code with PKCE, loads userinfo, removes callback credentials from the URL, and resumes token refresh. Configure your host's SPA fallback so a direct callback load does not return 404.
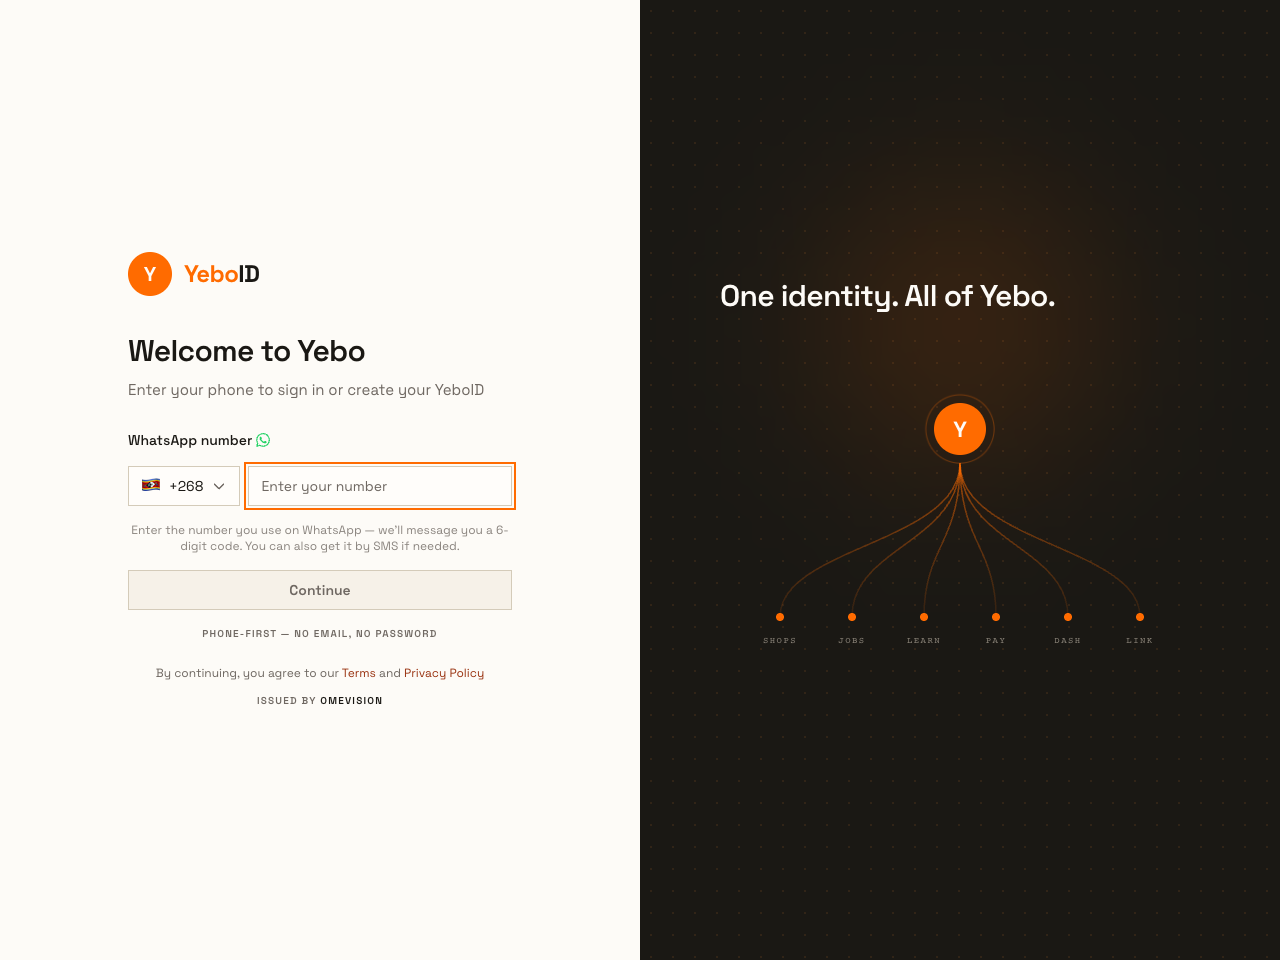
Real local login UI; no OTP was sent. The user completes authentication and consent on YeboID.
Walk through your first sign-in
- Start your React app on the address you registered. Open it while signed out.
- Select the YeboID sign-in button. You should reach YeboID's hosted sign-in screen, rather than a password form inside your own app.
- Complete the sign-in method shown on that screen. Keep any verification code private.
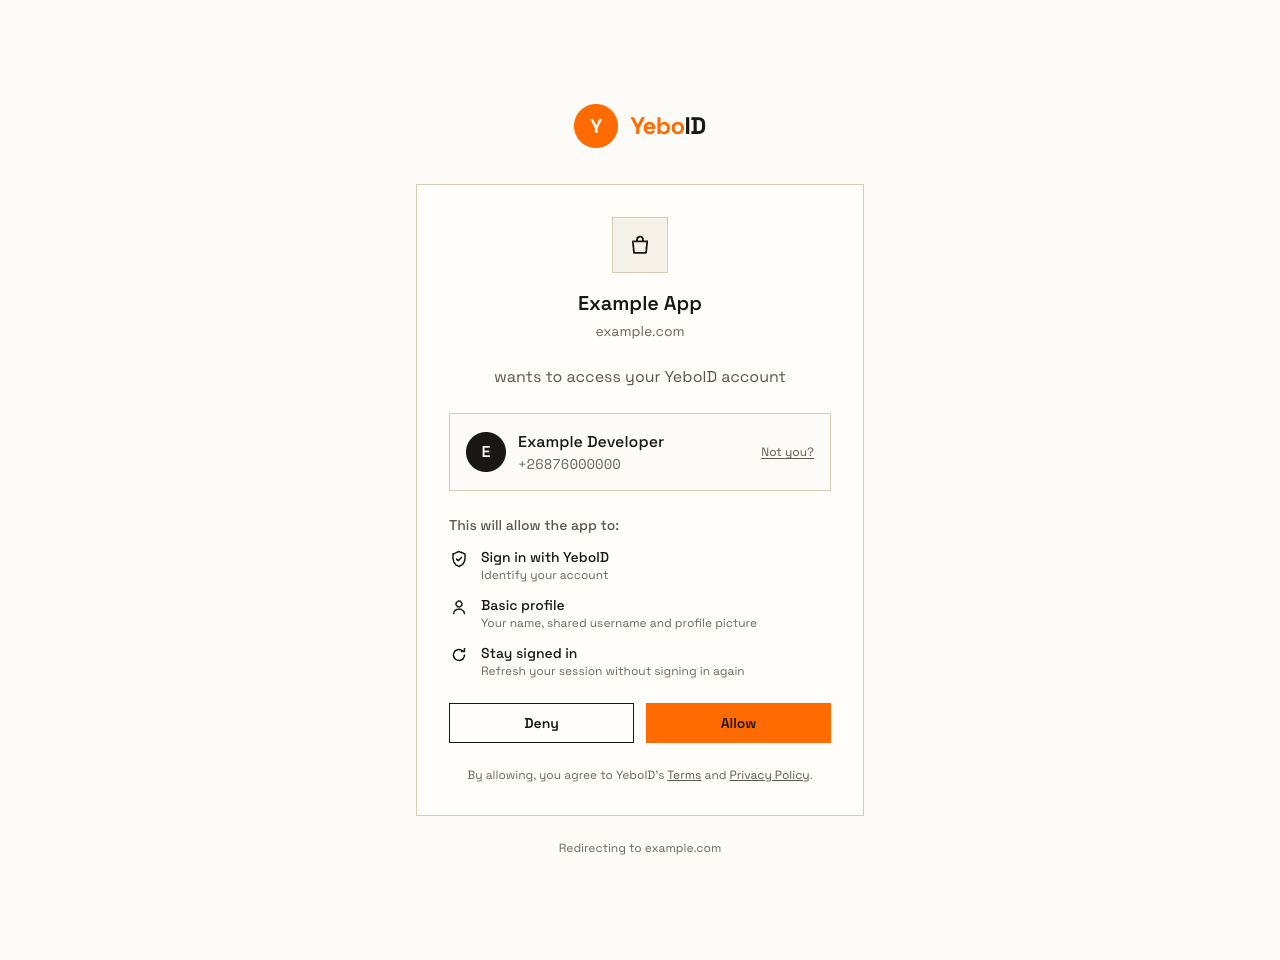
- Check the application name and permissions on the consent screen before approving.
- After the browser returns to
/auth/callback, wait for the account to load. Your app should show the shared username and the same stablesubfor repeat sign-ins.
If it stops: a redirect mismatch means the scheme, host, port or path differs from registration. A direct callback 404 means the hosting service needs an SPA rewrite. A declined consent must remain an error; do not manufacture a signed-in user. The troubleshooting guide explains the next checks.
4. Protect your API
import express from 'express';
import { YeboID, type AuthenticatedRequest } from 'yeboid-node';

const app = express();
const identity = new YeboID({ clientId: process.env.YEBOID_CLIENT_ID! });

app.get('/me', identity.authenticate(), identity.requireScopes('profile'),
  async (req, res, next) => {
    try {
      // JWT verification gives identity + permissions. Userinfo gives consented profile claims.
      const personId = (req as AuthenticatedRequest).user!.sub;
      const profile = await identity.getUserInfo(req.headers.authorization!.slice(7));
      res.json({ personId, username: profile.handle });
    } catch (error) { next(error); }
  });
app.listen(3000);
The SDK validates RS256 signatures, issuer, audience, expiry, token purpose, and the actual scopes array. An ID token is not an API access token. Use requireScopes for authorization, and check your own resource ownership separately. Use introspection for sensitive operations that need current revocation state.
5. Verify the integration
- A signed-out visitor sees the sign-in button; failures are visible and retryable.
- A successful callback returns the same
subandpreferred_usernameas YeboID. Never derive a username from a person's name. - A token issued to a different client, an ID token, an expired token, or a missing permission is refused by your API.
- A user who declines consent sees a clear error rather than a signed-in state.
- Refresh rotates credentials without duplicate refresh requests. Failed logout remains visible.
Continue with permissions, Node, Web / React, business accounts, and troubleshooting.
Consent preview
The hosted screen names your app, shows the signed-in account, and lists requested permissions before approval. This screenshot uses the real local UI with synthetic fixture data.
Finish and continue
Test signing out and signing in again. A failed network call must remain visible, a declined consent must not create an account session, and an expired access token must be refused by the API. Then choose your platform for the matching SDK and setup details.